Crochet Kitchen Scrubby Pattern

This crochet kitchen scrubby is designed to have the same look and feel as your kitchen sponge, but is 100% cotton and reusable.
This post contains affiliate links, which means I may receive compensation (at no additional cost to you) if you make a purchase using these links.
Why I Was Set on a Rectangle Scrubby
I’ve been eyeing the Red Heart Scrubby yarn for a while now. Such a cool yarn invention! I’ve seen some creative and cute crochet kitchen scrubby patterns made with it. I’ve also been eyeing a million and one patterns for dish cloths using 100% cotton yarn.

The problem is, I really like my little kitchen sponges.The kind you find wrapped in plastic next to the dish soap at the store, with one side of strangely already moist sponge and the other side that has a layer of scratchy, wiry material perfect for scrubbing. They fit my hand perfectly, not too big and not too small, and I’ve been using them for the last 17 years. Their downside is that they are not really meant to last a long time. They also get really stinky really fast. Which means I go through a lot of them.
As I saw all these cotton dishcloth patterns and crochet kitchen scrubby patterns floating around, I really liked the idea that they were reusable. However, I am fully rooted in my kitchen habits and a washcloth or a scrubby circle just doesn’t feel right in my hand as I do the dishes. I need that slightly squishy, half inch thick, little 3 by 5 rectangle to feel just right. Otherwise, I feel awkward doing the dishes and I swear I go a little bit slower!
So, I decided to see if I could make something that had the same size and feel of my kitchen sponges, but using a combination of 100% cotton yarn and scrubby yarn!
How is this double sided scrubby constructed?

The 3 goals I had for this crochet kitchen scrubby were: 1) a scrubby with the same dimensions of a kitchen sponge, 2) a scrubby with some squeezable thickness like a sponge, and 3) a scrubby with one soft side and one scrubby side like a kitchen sponge.
The dimension part was easy and even the two-sided requirement was not difficult to figure out. The part I needed to get a little creative with was the squeezy thickness. The solution I landed on was to crochet a rectangle three times the width that I wanted for the sponge so that I could fold it up into thirds and stitch it together, creating a nice thick feel. I crocheted the scrubby yarn along with the cotton yarn in the final third of the rectangle so that when folded up, only one side had the rough scrubby texture.
I’m pretty happy with how my crochet kitchen scrubby turned out! I have the best of both worlds! I don’t have to change my kitchen habits of 17 years, but I get the added benefit of a scrubby that I can toss in the washing machine over and over.
The final perk? These are super easy to make! The whole thing can be completed in under an hour. And with all the colors of cotton and scrubby yarn out there, the color combination possibilities are endless! I hope you have fun with it!
Interested in learning more about cotton yarn and what to make with it? Check out my Ultimate Guide to Crocheting With Cotton!

The Pattern
If you would like to purchase an inexpensive, printable pdf version of this pattern, you can find it here at my Etsy shop. Otherwise, scroll down for the free version.
Add this pattern to your Ravelry favorites HERE.
Materials:
US I/9 5.5 mm Crochet hook
Red Heart Scrubby Yarn
100% Cotton Size 4 yarn
Yarn needle for weaving in ends
Scissors
Gauge:
3” x 3” swatch = 9.5 hdc x 7 rows
Finished measurements: 5.25” x 3.75”
Stitches Used:
(ch) chain
(sc) single crochet
(hdc) half double crochet
(sl st) slip stitch
Video Tutorial:
Written Instructions:
Chain 16.
Row 1: Hdc into the 2nd chain from the hook and each chain across. (15)
Row 2: Ch 1. Turn. Hdc in the same stitch and each stitch across. (15)
Row 3-16: Repeat row 2. (15)
Row 17: Starting with this row, pick up the Scrubby yarn along with the cotton yarn and crochet with both together. Ch 1. Turn. Hdc in the same stitch and each stitch across (15).
Row 18-24: Repeat row 17. (15) After completing the 24th row, finish off the Scrubby yarn and weave in ends (or wait to weave in at the end). Leave the cotton yarn on your hook for the next step.
Putting it together: Fold work into three, so that there are 3 layers of cloth, with one of the scrubby sides facing out.


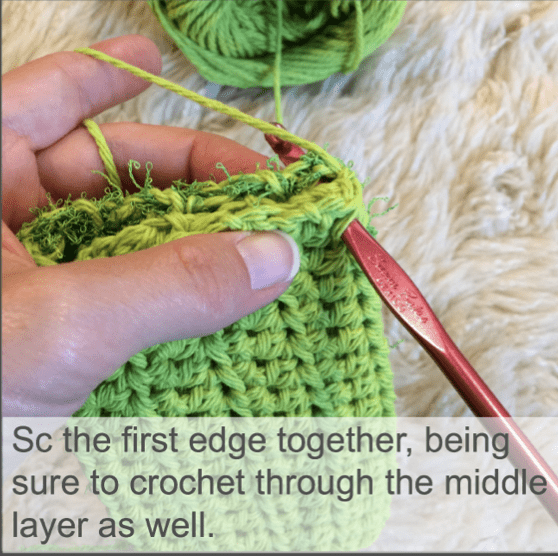
Ch 1. Starting at the corner where your chain is, with the scrubby side facing away from you, crochet your edges together with sc stitching evenly along the edge. Make sure to go through both outer sides with the hook, but ALSO crochet through the “inner” layer as well, so that the layer does not bunch when used. When you get to the first corner, sc 2 in the corner. (note: count the number of stitches on this first edge so that you can be sure to use the same number of stitches on the opposing edge). The next edge is not an open edge, but in order to maintain a clean line around the entire scrubby, go ahead and single crochet across the edge (note: count your stitches on this edge as well so that you can be sure to use the same number of stitches on the opposing edge).


2 sc at the next corner. Sc evenly up the 3rd side. 2 sc in the corner. Sc the last edge together, ending with a 2nd sc in the 4th corner (the first sc for that corner was your first sc of the border). Sl st to the first sc. Finish off and weave in ends.


Second Option: If you do not like the feel of the thick edging created by the sc, you also have the option of just sewing the edges together with a whip stitch with a yarn needle. This edging won’t be as visually appealing, but the feel of a thinner, less bulky edge might be a preference for some.
More Free Kitchen Patterns You Might Enjoy:
Peek-A-Boo Water Bottle Carrier
Note: Feel free to sell finished products made with this pattern. If finished products are posted online, please include a reference/credit to this pattern. Do not distribute or claim the pattern as your own, or alter and use my photos to market your finished products. Do not use this pattern to create video tutorials.

What a terrific idea! Just like my old-fashioned kitchen sponge! I know what you mean about changing kitchen (or any!) habit of 17 years. Thanks for sharing!
Thanks Claudia! Glad I’m not the only one! 😀
Just made one love it first time working with scrubby yarn only thing I felt it was too thick was thinking about making it thinner
Hi Roxie! Glad you liked the pattern! For a thinner scrubby you could certainly lower the total rows to 16 instead of 24 and do the scrubby yarn in rows 9-16 and fold in half instead of thirds. I may have to try it too and see if I like it :).
I just made one and I see what you mean about the thickness. In fact it’s so thick it doesn’t dry even overnight. I’m going to try just the scrubby yarn with the cotton without the other layers and see how that works.
That works a lot better!
i love the scrubby pattern ,it is very easy, but when sewing together it is very hard to catch the inner layer.i have tried to sew it 3 different timesand cannot seem to “catch”the inner layer.
Hi Michele, glad you are enjoying the pattern. When I sewed it together at the first edge (and then the opposing edge) I put the hook through one layer at a time… first the one closest to me, then align the middle layer where I want it and put the hook through, then through the back layer, yarn over and pull through all three. On the step where you are crocheting along the edge that is not really an edge (after the first corner), I did not worry about catching the inner layer. Since I lined up the inner layer and sewed it on the other two edges, that seemed to be enough to hold it in place. Let me know if that helps!
I had to use a needle instead if a hook 🙂 much easier and not as hard on my hands.
great Pattern and so glad I found it on pinterest , I’m not into the cute flower patterns and stuff for scrubbies, this is practical and useful. I’m like you want something that fits in my hand like the ones from the store. I’ve been making washcloths and towels for my kitchen so this is great. It can all match now LOL.
Just made.4 of these today. My first time trying Scrubby Yarn. Love it. Love this super easy pattern for the sponges.
Thanks for commenting Becky! I am so happy you love it! 😀
I have a hard time crocheting just the scrubby yarn so this pattern was really helpful. Did not think of combining the cotton to make it easier to see. Thanks
So glad this helped you Crystal! 🙂
Just made one and I love it! I use the same green and blue sponges and this is a perfect replacement. I’m new to crocheting and this was very easy to understand. Thank you!
Kimberly, I am SO HAPPY you like it and it was easy to understand! Thanks for commenting!
You’re welcome! Thank you!!
How many can you get from the one ball of scrubby yarn?
A lot! There is only about a 3 x 5 hdc section of the pattern that uses the scrubby yarn, so it does not use much at all. I don’t know how far one skein will go yet, as I’ve been doing lots of different colors, so I haven’t run out of any one color yet. I’ve made at least 4 in one color though and there is still a lot of my skein left.
How would you wash them? Should they be aired dried after washing? I really like this pattern. I’m definitely going to make more.
Hi Karen! I just throw them in with the regular laundry to wash and dry.
I machine wash air dry
Wow, these look great and so easy to do. I have made a ‘scrubber’ with just the Scrubby yarn. Makes a fantastic scrubber that lasts and lasts, but it is a little hard to work with, I. e. hard to see and work the stitches. Going to make a bunch of these for friends. Thanks for the pattern!
I hope you enjoy them Bev! 🙂
I’ve really never used a sponge, but I like the crocheted sponge. I ‘be made several. Something that worked for me was to leave a long string when starting chain, then use the string to sew one side to the middle side, made it easier to work with and no shifting.
Great idea Donna! Thank you for sharing!
Great idea Donna! Love this very useful, practical and eco friendly sponge alternative!! I had trouble with the middle slipping, too. Gonna try your idea next! Thanks to caabcrochet for the awesome pattern.
Love this pattern and (of course) the end result. Worked up quick and beautifully. Thank you for sharing. Genius!
Thank you for commenting Lissa! So glad you like it! <3
I just made one up tonight. Love the look and feel of this pattern. I was using a round one with both cotton and scrubby yarn, but this one is going to be my new favorite. Thank you for sharing.
Thanks for commenting Patty! I’m so glad you like it! 🙂
For anyone who has made this.. chain 1 or 2 for turning chain? Normally you would chain 2 for half double crochet, interested in knowing if the chain 1 and turn per instructions, works for this.. I am really excited to make this but want to be sure I do this correctly as I am new to crochet.
Hi Debbie, I personally prefer 1 chain for hdc. I don’t like my edge stitches to be too loose. But there would be no problem if you wanted to do 2 chains. I think the pattern would work either way. Hope that helps!
Thank you so much for your reply!
You’re very welcome. I hope you enjoy your weekend http://[email protected]
Fantastic question. I’ve personally only would chain 1 as specified. I’ve only chained 2 when working with double crochet rows http://www.kitchentowels4u.etsy.com
I love this pattern! I bought some scrubby yarn awhile ago and was really frustrated working with it. Combining it with cotton is a perfect option and these sponges turned out GREAT!!
Yay! Thank you for taking the time to comment Mary! That makes my day! 🙂
What a great idea! I also made some scrubby kitchen sponges recently, but they just didn’t feel right in my hands, like you said. This looks like the perfect solution! Pinning! 🙂 Lisa
Thank you for taking the time to comment Lisa! So glad these might work for you! 🙂
Love your pattern . I took a J hook doubled the cotton side and then doubled the scrubby yarn , folded , and single crochet around.
So glad you like it Camille!
Hi. do you feel like they died better this way? I came to the comments to see how the middle layer faired with moisture. someone mentioned it didn’t dry over night.
Love this kitchen scrubby. I am trying to make this, but the instructions say “Row 1: Hdc into the 2nd chain from the hook and each chain across. (15)
Row 2: Ch 1. Turn. Hdc in the same stitch and each stitch across. (15)
Row 3-16: Repeat row 2. (15)”
Usually on a half double crochet, you would chain 2, then turn…which would be correct?
This looks like an excellent idea to solve my eco sponge problem! How often do you wash them? How are they holding up and how long do you anticipate they will last? Thanks!
I wash every day or two. Mine have physically held up for a good 6 months, but started to get a musty smell after several months.
Try soaking in vinegar before laundering. When my bath towels get funky smell, I spray them with vinegar, let sit a bit then launder. It takes the bad smells out and doesn’t hurt the color like bleach does. Thanks for this pattern!
Thanks so much for the idea Kathy!! Glad you like the pattern! 🙂
So cute, thank you
So glad you like it Kelly! 🙂
Love this pattern. Thank you for sharing it with us. I can’t wait to get started on a few of these.
Thanks Cindy! 🙂
I am SOOO glad I came across this! My mom has made a bunch of the scrubbies for me to wash dishes or myself and I just don’t like the small cloth. I am most certainly a sponge girl but hate the waste and the smell and the toxic aspect of it. Thank you!!!
So glad you are excited to try this Casey! I hope you love it! 🙂
I can’t wait to make this! I think I will shorten it and fold in half as I don’t want a supper thick ‘sponge’. I have been crocheting little rectangles with the scrubby yarn and cotton like you do on 1/3 of your sponge, but I really like the idea of having a soft side!
Have you tried the Red Heat Scrubby Sparkle? I LOVE it!! I’ve used both and I think the sparkle does a better job on my dishes 😉
I have not tried the sparkle yet! I guess I will have to give it a go if it does an even better job! 😀
I love this pattern and how easy it is. I’m trying to learn to crochet, and figure having a very specific goal in mind for a useful item is the way to go. This is perfect and I can’t wait to try!
One question – I’m trying so hard to use more biodegradable products and less plastic (and it is HARD believe me). I like the idea of the scrubbie yarn, but am not a huge fan of the fact that it’s polyester. I was thinking a thick, rough, hemp cord might achieve a decent scrubbing effect (probably not as good, but good enough maybe?) without the plastic. Do you think that would work in this pattern in the same way the scrubbie yarn fits in?
Hi Genevieve! So glad you are enjoying the pattern! I have had similar thoughts about this. A hemp cord might be thicker than the scrubby yarn, so you might want to try just changing over to the hemp only for that section, rather than crocheting both yarns at once if it is too thick. You may just have to experiment and see how that feels. Also, I’m not sure how rough the hemp is, as I haven’t worked with it, or how well it holds water and/or dries out. You would have to experiment with how rough, gentle, etc. it is on the dishes to see how you like it. I would definitely be curious to hear how it turns out and if you find an alternative that you like!
I will definitely let you know what I learn!
Yarn Bee Scrub-ology cotton, is 100% cotton. I used this and am hoping it doesn’t shrink to much. Purchased at Hobby Lobby. 😊
Great option!
My boyfriend uses bleach to clean and refused to use the hand made cloths. I made him one in white cotton with white scrubby yarn and he loves it. He is theilled that he can use bleach cleaner and not ruin it. Then throw it in the wash with his whites. He has finally agreed to replacing the dish sponge and keeping them seperate. Great pattern.
So awesome! Love it! 😄
Hello! I love this pattern. I plan on making a number of these for gifts. Do you have an idea of how many sponges you can make with each ball of cotton yarn? Just want to make sure I order enough to make as many as I want. Thank you!
Hi Natasha – I made all of mine in different colors, so I’m not exactly sure how many would come from one skein, but from the weight of them I would guess you could get at least two from each regular skein and at least 3 from a super size skein. The scrubby yarn would go really far since it uses very little for each sponge.
Hi there! Absolutely LOVE this idea! Approximately how many scrubbies can you get out of one Red Heart Scrubbie ball? I’m planning to use Red Heart Scrubbie Smoothie for the non scrubbie portion. The Scrubbie Smoothie balls are 153 yards and the Scrubbie balls are 92 yards.
Thanks! 😀
I made all of mine in different colors, so I’m not exactly sure how many would come from one skein, but from the weight of them I would guess you could get at least two from each, maybe 3? So glad you like the pattern!
Great pattern!!!! Wish I had seen it before crocheting a lot of round scrubbies. Family and friends love them so now I’ll be crocheting your pattern. The Wal-Mart by me is discontinuing the red heart scrubby yarn and I bought the last box they had (39) @$1.00 each. 😀
So glad you like it Nancy! You will get a lot of scrubbies out of that many skeins! What a find!!
Hi there, your complement & message is received with much thanks. It takes 1 skein of lillys cotton. Unsure of the red heart. Thanks
I’m loving your scrubbie pattern! I have made several and think they are cute enough to share with my dishcloths!
So glad you are enjoying it Denise!! 🙂
? I would like to make this scrubby into a bath / shower exfoliating hand glove. How can I adjust the pattern for this? or do you have a pattern similar to a bath/shower glove to crochet.
Hi! I love this pattern, and even my skeptical husband loves it. I am wondering how often you wash yours and how you handle them when in use? I had one that I used for a couple of days and then tried to let dry before tossing in the wash, but it sat out for a full day and didn’t dry. By the time I got it in the wash it smelled very much of mildew. Any tips for avoiding this? I’d love to make a bunch if I can get around this issue.
Hi McKenna, so glad you like the pattern. These definitely take longer than a traditional sponge to dry. So, I tend to use one for a day or two. Then I just throw them in the wash whether they are wet or dry at that point. I wash them in with any normal load, but I have heard that adding vinegar to the wash can help if there is a mildew smell. Hope that helps!
Hello
thanks for the video and pattern. very easy to work. one thing though, i found that the cotton yarn (used the one you used) color ran. did this happen to you?
Hi Christiane, I did not notice the color running. But it did fade after washing.
So… Some time has elapsed. I just saw this. Thinking about this and the issues mentioned here. Vinegar for smells, hemp to avoid polyester, etc. I am unsure how to explain a thought I have, but I’ll try. A “foldable” version. Like the sandwich bags where you fold the little pocket over the end of the sandwich to hold the sandwich in place? Just make a “pocket” at one end, tuck in the remaining 3rd to reach thickness, wash dishes, “unfold”, rinse/wash by hand, sprits with vinegar, let dry over faucet. No Smelly-Smells.
This is a great idea Tracy!
I’ve been making the round kitchen scrubbers for a couple of years now and I love them but I know some people don’t like the round ones so I’ve been looking for a rectangle pattern I liked when I found yours. I LOVE this pattern. Thank you so much for sharing your pattern. I can’t wait to offer these to my customers.
Hope your customers love it! 🙂
I absolutely love this pattern and am happy I found it. I made and used my first kitchen scrubby/sponge yesterday and it worked perfectly and bonus that it is super cute too! Thank you so much for the pattern and video!!
I am so happy that you are enjoying this pattern Tammy! Thank you for taking the time to leave a comment!
I have hand issues and had difficulty holding the scrubbie together to work around the edges. I used a metal yarn needle and the opposite end of my working thread and basted the inner edge up to the scrubbie starting row. This kept that edge from drifting down. I also used Clover clips to keep the other edged clamped together. It was much easier to hold and didn’t hurt my thumb joints. I tried using na “I” hook but it was much larger than the dimensions listed. I dropped down to an “G” hook and that worked out better. Then I used an “H” hook for the last third with the scrubbie yarn because the “G” hook couldn’t hold both strands. My scrubbie edges sort of roll a little over the edges but it all works out ok. These are just the right size for my small hands. They work up quickly, too. I think I’ll add a hanging loop to help with drying.
I just made about 5 of these About a month ago I thought I was playing a smart making it that way. I didn’t know at the time that you had a pattern on it. I agree that easy to make and they are great. Going to try to get some made for Christmas gifts. The only Thank think different That I did was I made each row of double crochet.
Thank you so much for sharing this pattern! I made one last night and used it today and WOW… it works better than any dishcloth I’ve ever used, including ones I’ve crocheted (some with sections of scrubby yarn). I will be making a LOT of these for sure. Thank you again for sharing!
I am so glad you hear this! 😀
Easy to follow. Quick work up. Loved the pattern . I did the sewing together instead of SC around. I felt it finished better aesthetically for me. Thank you for sharing your pattern with us!
So glad you enjoyed it!!
This pattern was so inspiring!
I’ve made several, and they are amazing!! They last, work well, and DON’T get stinky!!
Ihave decided that my favorite combo is:
-cotton on one side,
-sparkle scrubby on the other, and a layer of
-chunky “milk cotton” polyester yarn from Temu in the middle. (It’s not cotton at all.)
I join and edge with the sparkle scrubby so I can scrub with the edges and corners.
The inner layer helps hold the soap yet dries quickly.
They’ve machine washed and dried just fine.
Thank You!!
I am so thrilled to hear you have enjoyed this pattern so much Susan! I have not heard of the milk cotton from temu. Sounds interesting!
Susan –
The chunky yarn looks thicker than the other yarns. Did you need to adjust the number of stitches to fit the width in the “envelope” made by the other yarns when folded?
Hi Susan! The width is thicker on the rows where you crochet with both kinds of yarn together. However, I did not have any trouble sewing it together. If you want to see how I did it, a video tutorial is included at the beginning of the pattern. Hope that helps!
I wish I’d read the comments first before making this.
I think that when I make it again I will make it smaller only work with scrubby yarn the last 7 rows. Someone I work with bought one it was smaller and the one side is entirely scrubby yarn.
Esther –
Thank you so much for this pattern. I purchased what I think is a thin version of this pattern a couple of years ago at a craft fair when I was out of town, and feel in love with it as soon as I used it. It hardly took any effort to clean whatever I used it on. Commercial ones would have required a lot more effort. At that point, I was wishing I had bought the second one when I was at the fair, but you know how it is…never used one before, wasn’t sure how well it would work, didn’t want to get stuck with two of something that might just sit there.
I am actually looking for a few simple craft things to keep my hands busy when I sit down at the end of my day. The scrubby crossed my mind and led me to your website. And I like the idea of a thicker, sponge like, feel. So I am going to round up some yarn and start working on a few thick and thin scrubbies to have on hand for me and to use as part of gifts.
Thanks again.
Hi Carol! I’m so glad you found my site! I hope you enjoy the pattern!