Comfy Cotton Wrap

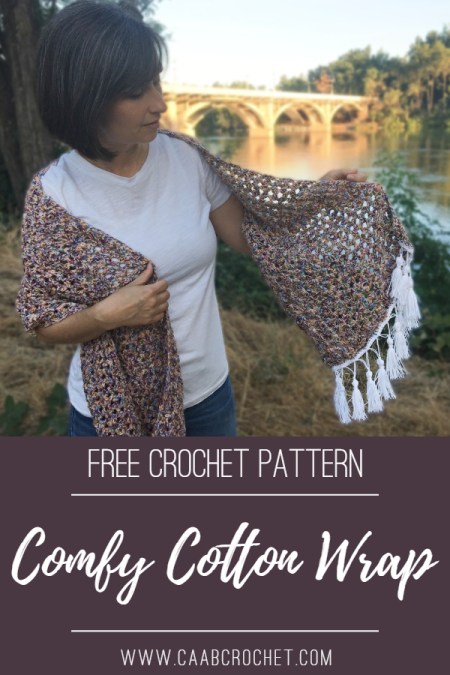
This crochet lacy wrap pattern is the perfect mix of light and cozy. It is just right for those transitional seasons of Spring and Fall. It has just enough cover when draped over your shoulders to give you some warmth. But if you also love a big super scarf, this can also be worn chunky and thick around the neck.
The unique tassel border gives it the perfect bit of extra flair.
The Origin Of This Pattern
The first time I used the double v stitch in a pattern was for my Spiced Mulberry Brimmed Beanie. I loved it so much that I knew I had to use it in another pattern. The stitch was so simple, yet created such a delicate, lacy design. A crochet lacy wrap pattern seemed like a good project to really show that off.

The tassel edging idea came to me while roaming the aisles of Hobby Lobby. I don’t often get to do that without kids in tow, so it’s always a treat when I do! I often stumble on some kind of inspiration (or at least some yarn I have to buy!) when I get that time to wander.
This time the inspiration came in the sewing aisle where they have all their pre-made tassel borders for upholstery and sewing projects. Sewing is not my area of expertise, but I think they are usually used for curtains and similar items. I really liked the look of some of the tassel designs and did my best to reconstruct one of them using crochet.

If the border is your favorite part, you can find a video tutorial on how to create it HERE.
The Yarn For This Pattern
This post contains affiliate links, which means I may receive compensation (at no additional cost to you) if you make a purchase using these links.
I actually picked up the yarn I used for this crochet lacy wrap pattern before I even knew what I was going to do with it. It was one of those yarns that I just saw and loved it so much I couldn’t pass it up!
The yarn is Lion Brand’s Comfy Cotton Blend in Stained Glass. It is a size 3 yarn, so it has the perfect weight to keep it. light, but also still give some warmth. It is 50% cotton and 50% polyester, so I’m hoping it will wear and wash well. The texture is very soft and smooth.

For the tassels I used an old skein of Red Heart Luster Sheen, which is a sport weight yarn that I had in my stash. It is no longer in production, but any size 2, sport weight yarn should fit the bill. This particular yarn is a 100% acrylic yarn constructed with a chain texture, which gives it a really silky drape, a lot like the texture of curtain or upholstery tassels.
If you’re going for the delicate, flow-y tassel like I was, then the most important factor is that lightweight yarn.
The Pattern
If you would like to purchase an inexpensive, ad-free printable pdf version of this crochet lacy wrap pattern, you can find it here at my Etsy shop.
Add this crochet lacy wrap pattern to your Ravelry favorites HERE.
To jump to only the instructions for the tassel edging, go HERE.
Materials:
Size 3 Yarn (I used 1 ½ skeins of Lion Brand Comfy Cotton Blend in Stained Glass)
US 6.0 mm/ Size J Crochet Hook
Yarn Needle
Scissors
Stitches Used:
(ch) Chain
(fdc) Foundation Double Crochet
(dc) Double Crochet
Gauge:
After completion of Row 7, my project was 4” long/tall and 15” wide. See pattern notes for adjusting gauge if needed.
Finished size: 60” long and 15” wide (length is easily adjusted by completing more or less rows before finishing)
Pattern Notes:
Beginning chain of first and last 2 rows does not count as a stitch.
I tend to crochet tightly. If after the first few rows your project is significantly wider or narrower than 15”, you have a different gauge than me. If you are crocheting more loosely than me (project is larger) and you would like to stick to a 15” width, you can move to a smaller hook (or larger if you crochet even more tightly). Some people even need to go down two hook sizes to match my gauge. If you are happy with the width and drape at your own gauge, then feel free to continue as you are.
Length of the project can be easily adjusted by adding or removing some of the repeating rows.
Pattern:
Row 1: Fdc 72.
Alternative option: If you do not like foundation stitches, you can chain 74, dc in the 3rd chain from the hook and in each chain across. (72) However, a foundation stitch will make adding the tassel edging in the picture a little easier to do.
Row 2: Ch 2. Turn. Dc in the same stitch. Skip the next two stitches. [2 dc, 3 ch, 2 dc] in the next stitch. *Skip the next 5 stitches. [2 dc, 3 ch, 2 dc] in the next stitch.* Repeat from * to * ten more times. Skip the next two stitches. 2 dc in the last stitch of the row. (total of 12 stitch clusters, not including the 2 dc at each end)
Row 3: Ch 2. Turn. Dc in the same stitch. [2 dc, 3 ch, 2 dc] in the ch 3 space of the last stitch cluster from the previous row. Repeat [2 dc, 3 ch, 2 dc] in each ch 3 space across. 2 dc in the last stitch of the row. (total of 12 stitch clusters, not including the 2 dc at each end)
Rows 4 – 84: Repeat Row 3.
Note: my wrap was about 59” long after Row 85. I wanted mine to be pretty long. You can adjust the length to your preference by doing more or less rows before moving on to instructions for Row 85.
Row 85: Ch 2. Turn. Dc in same stitch. In the next two stitches, Dc2tog. 3 Sc in ch sp. Dc in the stitch after the ch sp. Dc in next 2 stitches. 3 Sc in the ch sp. Repeat from * to * until the last ch sp. (So essentially 3 dc between each ch sp and 3 sc in each ch sp). Dc in the stitch after the last ch sp. In the last two stitches, Dc2tog to end the row. (73)
Row 86: Ch 2. Turn. Dc in same stitch and in each stitch across. (73)
Finish off. Weave in ends.
You can find instructions for the Tassel Edging HERE.
Note: Feel free to sell finished products made with this pattern. If finished products are posted online, please include a reference/credit to this pattern, including a link. Do not distribute or claim the pattern as your own, or alter and use my photos to market your finished products.
Pin it for later:


This is beautiful!!
Thanks so much Michelle!
Comfy cotton wrap
What is the multiple of chains to make this wrap wider?
Thank You
Hi Tina, A multiple of 6, plus 1.
I would like to make it wider as well Tina!
Can you tell me how many chains you created, how wide it was and how much more yarn you needed?
I’d like to make these for Mother’s Day gifts :).
Want to make one.
For row 2, you say to repeat from * to * ten more times but I don’t see any stars.
Row 2: Ch 2. Turn. Dc in the same stitch. Skip the next two stitches. [2 dc, 3 ch, 2 dc] in the next stitch. Skip the next 5 stitches. [2 dc, 3 ch, 2 dc] in the next stitch. Repeat from * to * ten more times. Skip the next two stitches. 2 dc in the last stitch of the row. (total of 12 stitch clusters, not including the 2 dc at each end)
Thanks for letting me know Gretchen! Sometimes when I input my patterns the system auto corrects my asterisks to italics! I must have missed it. I will go in and update it. Thanks again!
Perfect – thank you!
It never would have occurred to me to use a different yarn color for the tassel edging. (I would have used one of the colors in the wrap.) But this white is gorgeous! It adds both visual interest and a touch of class–what’s classier than white? I’ve never been a big fan of tassels because they tend to catch on things–mostly my fingers–but I will definitely add this edging. Thank you, Esther, both for the pattern and the inspiration!
What size hook would you suggest for fingering weight yarn? Thank you.
Usually a yarn label will include the recommended hook size. Do you have the label for the yarn you are using?