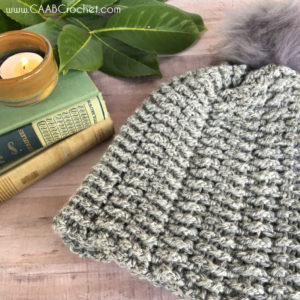
Creek Bed Beanie

This ribbed beanie pattern has a unique texture, while still maintaining the feel of a classic ribbed beanie. It is super comfortable and has a great stretch, especially when made up with a really soft worsted weight yarn. You can dress it up with a pom or keep it simple without one for an every day, dressed down look.
The Origin of This Pattern
I really enjoy playing with stitches and repeats to try to create something unique. This was one of those patterns that came together after I sat around and thought, “I really like that stitch… what if I changed the direction of the rows… what if I alternated here and here…” And eventually came up with something I liked!
The origin of the ribbed beanie pattern name was also really fun. I asked on social media for people’s ideas and got some great feedback! I enjoyed hearing other people’s perspectives and seeing things in the pattern I wouldn’t have seen without someone else’s insight. A lot of people said it looks like rock or sand-related imagery, like river bed, creek bed (the one I chose of course), sand bar. But then there were some really unique ones like pine cone, peas in a pod, corn husk, fossils, a plowed field! It was SO fun to hear everyone’s thoughts! As you can see, I went with “Creek Bed.”
The Yarn For This Pattern
This post contains affiliate links, which means I may receive compensation (at no additional cost to you) if you make a purchase using these links.
 The yarn for this ribbed beanie pattern is one of my go-to worsted weight yarns… Premier Everyday. So so soft and nice to work with. And for a hat like this, with so much texture, it creates an incredible “squish” factor! This definitely works up a warm and cozy hat that is very comfortable to put on. It is quite similar to Red Heart Soft and Caron Simply Soft (but a little less sleek), which are two of my other faves.
I really liked how the color I chose (a heather tone in grey) really enhanced the look of “sand” or “pebbles.” I can see why that theme was present in so many of the name suggestions.
The Pattern
If you would like to purchase an inexpensive, ad-free pdf version of this ribbed beanie pattern, you can find it here at my Etsy shop. (scroll down for the full free pattern)
Add this ribbed beanie pattern to your Ravelry favorites HERE.
Materials:
Size 4 Yarn (I used Premier Everyday yarn)
USJ/ 6.0 mm Crochet Hook
Yarn Needle
Scissors
Gauge:
To test gauge, complete the first row and if the length of your row at 40 stitches does not match the pattern length stated, then adjust hook size (smaller hook if you have less stitches, larger hook if you have too many). Or, if you like the drape of your gauge, even if the number of stitches does not match, adjust the number of stitches per row (see pattern notes). If you have a much looser gauge than me and have to go down more than 2 hook sizes, you may prefer to adjust number of stitches as opposed to going down that many hook sizes.
Stitches Used:
(ch) chain
(sl st) slip stitch
(fdc) foundation double crochet
(fpdc) front post double crochet
(bpdc) back post double crochet
Pattern Notes:
I tend to crochet tightly. So be sure to check your gauge in the first row and if you are crocheting more loosely you can move to a smaller hook (or larger if you crochet even more tightly). I find a lot of people may even need to move down two hook sizes to match my gauge. However, if you have to move down even more than two hook sizes, or if you like the drape with the hook you are using, it is also an easy pattern to adjust along the way. All you have to do is keep your stitches per row an even number and stop at the measurements stated in the pattern.
Pattern:
Row 1: Complete 40 fdc (or until 9.25” long). (40)
Note: If you prefer not to use fdc, you can chain 42. Dc in the third chain from the hook and in each chain across. (40)
Also, the 9.25 inch measurement will end up being the height of your hat. This length will be slouchy. This can be adjusted if you want more or less slouch. Just be sure to keep an even number of stitches in your row.
Note about gauge: This is where you can test your gauge. If 40 stitches creates a row much larger or smaller than 9.25”, then you have a different gauge than me. You can adjust by starting over with a smaller or larger hook. However, if you need to adjust by more than 2 hook sizes and prefer not to, you can choose to adjust the number of stitches per row instead. Just remember to keep the number of stitches in the row an even number.
Row 2: Ch 2. Turn. *Fpdc in the next stitch (skip the first stitch that is immediately under your chain 2). Bpdc in the next stitch.* (See photos below for how to complete Fpdc and Bpdc) Repeat from * to * across. The last bpdc is placed around the starting chain of the previous row (See photo below). (40)
How to complete the Fpdc:

How to complete the Bpdc:

Where to place the final back or front post double crochet of each row:

Note: For the first completion of rows 2 through 4, you will be placing front post stitches into a stitch from the previous row that is also towards the front. In the same manner, back post stitches will be placed in stitches from the previous row that are already towards the back. This creates a kind of vertical “line” traveling through the rows. However, after you complete rows 2-4 the first time, you will then repeat that sequence of rows for the rest of the pattern. Each time you repeat row 2, you will do the opposite and place a front post stitch in a stitch from the previous row that is at the back, and vice versa. This only happens in the repeat of row 2. This is what breaks up that vertical line every three rows and creates the ripple effect of the texture.
Row 3: Ch 2. Turn. *Bpdc in the next stitch. Fpdc in the next stitch.* Repeat from * to * across. The last fpdc is placed in the starting chain of the previous row. (40)
Row 4: Ch 2. Turn. *Fpdc in the next stitch. Bpdc in the next stitch.* Repeat from * to * across. The last bpdc is placed in the starting chain of the previous row. (40)
Rows 5-55: Repeat Rows 2 through 4 until the piece is 19-20 inches tall. (40)
Your rectangle should be roughly 19-20 inches long. This length should match the circumference that you desire for your hat. 19-20 inches is a small adult size. If you would like it to be larger or smaller, you can remove or add rows. Just be sure to end after a repeat of row 4.
Line up the short ends of the rectangle and sl st together. Turn so that the seam is on the inside of the hat. Finish off, leaving a long tail.

Use the long tail and a yarn needle to weave the yarn in and out along one end of the hat. Cinch tightly to close up one end of the hat. Make a knot to hold tight. Weave yarn in and out across the top to secure as much as needed. Tie off and weave in ends.


___________________________________________________________________________________________
More Free Beanie Patterns I Think You’ll Enjoy:
___________________________________________________________________________________________
Note: Feel free to sell finished products made with this pattern. If finished products are posted online, please include a reference/credit to this pattern. Do not distribute or claim the pattern as your own, or alter and use my photos to market your finished products.

Nice use of post stitches turned on their sides!
Thank you so much Edie!!
What size is this hat? Your other hats are small adult, I need a little larger. Do I just go up a hook size? Thank you in advance.
Hi Dianna, This pattern is constructed in a rectangle and then seamed together to create a tube and cinched at one end to make the tube into a hat. So, the width of your rows will be the height of your hat and the number of rows you add to your rectangle will determine the circumference. The instructions in the pattern say to stop when your rectangle is 19-20 inches tall, meaning the hat will have a circumference of 19-20 inches. You can make it bigger by just adding rows. It will look best if you end after a repeat of row 4. If you have more questions, feel free to email me [email protected].